(1)官方網站:remy sharp's b:log
(2)外掛程式下載:http://remysharp.com/2008/09/10/the-silky-smooth-marquee/
(3)官方範例:http://remysharp.com/demo/marquee.html
2010年8月26日 星期四
javascript 垂直輪播(跑馬燈、vertical carousel)
首先設定一個style(也可以直接放在標籤裡)
這是html的部份,包在外面的div高度跟裡面個別的div高度設定成一樣
這是javascript的部份
這是範例 http://ex.hsin.tw/exp06.php
.ann{overflow:hidden;height:20px;}這是html的部份,包在外面的div高度跟裡面個別的div高度設定成一樣
<div id="ann_box" class="ann" style="width:100px;">
  <div id="a1" class="ann"><a href="exp01.php" >exp01</a></div>
  <div id="a2" class="ann"><a href="exp02.php" >exp02</a></div>
  <div id="a3" class="ann"><a href="exp03.php" >exp03</a></div>
  <div id="a4" class="ann"><a href="exp04.php" >exp04</a></div>
  <div id="a5" class="ann"><a href="exp05.php" >exp05</a></div>
</div>
這是javascript的部份
function slideLine(box,stf,delay,speed,h)
{
  //取得id
  var slideBox = document.getElementById(box);
  //預設值 delay:幾毫秒滾動一次(1000毫秒=1秒)
  //       speed:數字越小越快,h:高度
  var delay = delay||1000,speed = speed||20,h = h||20;
  var tid = null,pause = false;
  //setInterval跟setTimeout的用法可以咕狗研究一下~
  var s = function(){tid=setInterval(slide, speed);}
  //主要動作的地方
  var slide = function(){
  //當滑鼠移到上面的時候就會暫停
    if(pause) return;
  //滾動條往下滾動 數字越大會越快但是看起來越不連貫,所以這邊用1
    slideBox.scrollTop += 1;
  //滾動到一個高度(h)的時候就停止
    if(slideBox.scrollTop%h == 0){
  //跟setInterval搭配使用的
      clearInterval(tid);
  //將剛剛滾動上去的前一項加回到整列的最後一項
      slideBox.appendChild(slideBox.getElementsByTagName(stf)[0]);
  //再重設滾動條到最上面
      slideBox.scrollTop = 0;
  //延遲多久再執行一次
      setTimeout(s, delay);
    }
  }
  //滑鼠移上去會暫停 移走會繼續動
  slideBox.onmouseover=function(){pause=true;}
  slideBox.onmouseout=function(){pause=false;}
  //起始的地方,沒有這個就不會動囉
  setTimeout(s, delay);
}
//網頁load完會執行一次
//五個屬性各別是:外面div的id名稱、包在裡面的標籤類型
//延遲毫秒數、速度、高度
slideLine('ann_box','div',2000,25,20);
這是範例 http://ex.hsin.tw/exp06.php
2010年8月25日 星期三
JavaScrip 自動輪播頁籤 ( IE 與 Mozilla 通用 )
CSS
HTML ( 以下為完整頁籤架構 )
JavaScript ( 更改輪播速度,範例為3000毫秒 )
.ImgTab {cursor:hand} ←這行可有可無,不影響程式執行
.MsgHide {height:174px;border:1px solid #aaa;padding:10px;font:normal 12px 細明體;display:none}
HTML ( 以下為完整頁籤架構 )
<table border="0" cellpadding="0" cellspacing="0">
<tr>
<td><img name="Tag_COMM" class="ImgTab" src="Tab_Img10.gif" onmouseover="Rot_Msg(1)" onmouseout="Rot_Msg()" onclick="Pause_Msg()"></td>
<td><img name="Tag_COMM" class="ImgTab" src="Tab_Img20.gif" onmouseover="Rot_Msg(2)" onmouseout="Rot_Msg()" onclick="Pause_Msg()"></td>
<td><img name="Tag_COMM" class="ImgTab" src="Tab_Img30.gif" onmouseover="Rot_Msg(3)" onmouseout="Rot_Msg()" onclick="Pause_Msg()"></td>
</tr>
<tr><td colspan="3">
<div id="Tag_IE" name="Tag_FF" class="MsgHide">
訊息內容...
</div>
<div id="Tag_IE" name="Tag_FF" class="MsgHide">
訊息內容...
</div>
<div id="Tag_IE" name="Tag_FF" class="MsgHide">
訊息內容...
</div>
</td></tr>
</table>
JavaScript ( 更改輪播速度,範例為3000毫秒 )
Msg_Timer=setTimeout("Rot_Msg()",3000);
JQuery 設計資源連結
jQuery Cycle Plugin
jQuery Plugin , 圖片輪播器 , 支援非常多的效果
jCarousel Lite
JQuery Plugin , 跑馬燈一種 , 可串接多張圖片或 HTML 內容 , 且中途跑馬時資訊不會間斷 , 不同於 <marquee> 效果
CSS Dock Menu
大部分是以 CSS 來模仿 Mac OS 的 Dock Menu , 效果非常順暢 , 但要搭配 JQuery 使用
ColorBox
ColorBox 是一套類似 lightbox 的 jquery plugin , 但對於 jquery 1.4 相容性比較好
jCaption
jQuery Plugin , 可以把 <img> 中的 alt 的文字變為圖說
2010年8月24日 星期二
C# 動態載入MATA資訊
        HtmlMeta mata = new HtmlMeta();
        mata.Attributes.Add("http-equiv", "X-UA-Compatible");
        mata.Content = "IE=EmulateIE7";
        this.Page.Header.Controls.Add(mata);
2010年8月14日 星期六
使用其他收信軟體收發GMAIL設定方法
設定您的用戶端,使其符合以下設定:
內送郵件 (POP3) 伺服器 - 需要 SSL: pop.gmail.com 使用 SSL: 是 通訊埠: 995
外寄郵件 (SMTP) 伺服器 - 需要 TLS: smtp.gmail.com (使用驗證) 使用驗證: 是 使用 STARTTLS: 是 (某些用戶端稱此為 SSL) 通訊埠: 465 或 587
帳戶名稱: 您的 Gmail 使用者名稱 (包含 @gmail.com)
電子郵件地址: 您的完整 Gmail 電子郵件地址 (username@gmail.com)
密碼: 您的 Gmail 密碼
除非您是使用最近模式將郵件下載到多個用戶端,否則請確定您已選擇不要在伺服器上保留郵件。 您的 Gmail 設定會決定是否要在伺服器上保留郵件,因此,您在用戶端上的這個設定不會影響 Gmail 處理郵件的方式。
請注意,若您的用戶端不支援 SMTP 驗證,您就無法透過您的用戶端,使用您的 Gmail 地址傳送郵件。
參考網址 https://mail.google.com/support/bin/answer.py?hl=b5&answer=13287
WINDOWS 2003 SERVER SMTP伺服器無法寄信到Hotmail 或 Yahoo 信箱(smtp;550 DY-001 Mail rejected)
收不到信的部分:
[3144]05/12/2008 18:14:25.906 450 4.7.1 : Recipient address rejected: Policy Rejection- Please try later.
收件者的信箱拒收。完整錯誤訊息如下
Action: failed
Status: 5.5.0
Diagnostic-Code: smtp;550 DY-001 Mail rejected by Windows Live Hotmail for policy reasons. We generally do not accept email from dynamic IP's as they are not typically used to deliver unauthenticated SMTP e-mail to an Internet mail server. http://www.spamhaus.org maintains lists of dynamic and residential IP addresses. If you are not an email/network admin please contact your E-mail/Internet Service Provider for help. Email/network admins, please visit http://postmaster.live.com for email delivery information and support
其原因是
hotmail 判斷您是浮動 IP 拒收。
如果您不是浮動 IP 請依他指示的連結處理。
451... Requested mail action not taken: mailbox unavailable
信箱無法使用。
請參考以下連結,您的 IP 被列入垃圾郵件黑名單, 而且是整段,112.116.0.0/16,請洽 Hinet 跟換 IP,或是依以下連結的說明處理。
http://www.spamhaus.org/pbl/query/PBL133756
不過我想若是使用真正的固定IP來使用SMTP服務時,應該就不會有這樣的問題摟
[3144]05/12/2008 18:14:25.906
收件者的信箱拒收。完整錯誤訊息如下
Action: failed
Status: 5.5.0
Diagnostic-Code: smtp;550 DY-001 Mail rejected by Windows Live Hotmail for policy reasons. We generally do not accept email from dynamic IP's as they are not typically used to deliver unauthenticated SMTP e-mail to an Internet mail server. http://www.spamhaus.org maintains lists of dynamic and residential IP addresses. If you are not an email/network admin please contact your E-mail/Internet Service Provider for help. Email/network admins, please visit http://postmaster.live.com for email delivery information and support
其原因是
hotmail 判斷您是浮動 IP 拒收。
如果您不是浮動 IP 請依他指示的連結處理。
451
信箱無法使用。
請參考以下連結,您的 IP 被列入垃圾郵件黑名單, 而且是整段,112.116.0.0/16,請洽 Hinet 跟換 IP,或是依以下連結的說明處理。
http://www.spamhaus.org/pbl/query/PBL133756
不過我想若是使用真正的固定IP來使用SMTP服務時,應該就不會有這樣的問題摟
WINDOWS 2003 SERVER SMTP伺服器無法寄信(error 5.7.1 Unable to relay for)
安裝完成後馬上就要測試一下,卻出現[ASP.NET]使用SMTP無法寄信當錯誤訊息是 System.Net.Mail.SmtpFailedRecipientException: 無法使用信箱。 伺服器回應為: 5.7.1 Unable to relay for
System.Net.Mail.SmtpFailedRecipientException: 無法使用信箱。 伺服器回應為: 5.7.1 Unable to relay for
若發生以上的錯誤訊息,請注意只需透過設定 步驟如下
IIS 管理員 - 預設 SMTP 虛擬伺服器 - 內容 - 存取 - 轉接限制 - 轉接 - 原「只有下列清單中的」改為「除了下列的之外的所有」 - 確定 (說明圖片如下)


System.Net.Mail.SmtpFailedRecipientException: 無法使用信箱。 伺服器回應為: 5.7.1 Unable to relay for
若發生以上的錯誤訊息,請注意只需透過設定 步驟如下
IIS 管理員 - 預設 SMTP 虛擬伺服器 - 內容 - 存取 - 轉接限制 - 轉接 - 原「只有下列清單中的」改為「除了下列的之外的所有」 - 確定 (說明圖片如下)


WINDOWS 2003 SERVER 架設SMTP伺服器方法
透過WINDOWS 2003 SERVER 「新增或移除程式」-「新增移除WINDOWS元件」-「WINDOWS 元件精靈」-「選擇E-MAIL Server」之後進行安裝


安裝完成後,即可在系統管理工具找到「POP3 Service」及在「網際網路資訊服務 (IIS) 管理員」看到「預設 SMTP 虛擬伺服器」,就表示你已經安裝完成瞜


安裝完成後,即可在系統管理工具找到「POP3 Service」及在「網際網路資訊服務 (IIS) 管理員」看到「預設 SMTP 虛擬伺服器」,就表示你已經安裝完成瞜


2010年8月11日 星期三
C# ListView 之 NumericPagerField 類別 設定分頁分法
CSS 頁碼屬性
CurrentPageLabelCssClass 目前頁碼的 CSS 類別。
NextPreviousButtonCssClass 下一頁和上一頁按鈕的 CSS 類別。
NumericButtonCssClass 表示頁碼之按鈕的 CSS 類別
參考 http://msdn.microsoft.com/zh-tw/library/system.web.ui.webcontrols.numericpagerfield(VS.90).aspx
CurrentPageLabelCssClass 目前頁碼的 CSS 類別。
NextPreviousButtonCssClass 下一頁和上一頁按鈕的 CSS 類別。
NumericButtonCssClass 表示頁碼之按鈕的 CSS 類別
參考 http://msdn.microsoft.com/zh-tw/library/system.web.ui.webcontrols.numericpagerfield(VS.90).aspx
[jQuery] jquery.scrollable 可以利用鼠標滾輪控制內容顯示

如果喜歡這類型的控制方法,可以使用mouse wheel 去拉動頁面。更重要的是不影響mouse wheel 正常操作。適當使用可以令website上的控制會更簡單而且可以放更多內容,但又不影響外觀,這是好的工具,值得推薦。
Demo http://flowplayer.org/tools/scrollable/index.html#
C# 如何從字符串中刪除 HTML標籤
using System.Text.RegularExpressions;
Regex.Replace(字串,@"<(.| \ ñ )*?>", string.Empty)
C# Left、Right' Mid 都可以用
        public string  StrLeft(string s, int length)
        {
            return s.Substring(0, length);
        }

        public string StrRigth(string s, int length)
        {
            return s.Substring(s.Length - length);
        }

        public string StrMid(string s, int start, int length)
        {
            return s.Substring(start, length);
        }
str = "123456789"
Left = str.substring(0,2) = "12"
Rigth = str.substring(str.length -2) = "89"
Mid = strsubstring(2,2) = "34"
using Microsoft.VisualBasic;
Strings.Right("aaaaa",2);
2010年8月10日 星期二
如何使用CSS製作「圖說文繞圖」 (範例實作)
很多朋友應該都知道如何使用標準的 html 達成簡易的文繞圖效果,作法很簡單,只需要在 img 標籤中加入以下參數即可:align="left" 或是 align="right" ;另外若是文字與圖片緊貼著不好看,你也可以使用 vspace 和 hspace 使圖片與文字之間預留空間。
以下為完整用法:
不過眼尖的朋友應該可以發現,使用 hspace 和 vspace 會使圖片的上下及左右皆出現間隔,這樣一來便會讓圖片於相對的內文無法對齊(如上圖所示);且無法順利的加入圖說(caption)。
以下將介紹如何使用簡單的CSS來製作方便實用的文繞圖效果,且可以漂亮的對齊內文。

CSS語法
以下為完整用法:
<img src="path.to.image" align="right" hspace="8px" vspace="5px">
不過眼尖的朋友應該可以發現,使用 hspace 和 vspace 會使圖片的上下及左右皆出現間隔,這樣一來便會讓圖片於相對的內文無法對齊(如上圖所示);且無法順利的加入圖說(caption)。
以下將介紹如何使用簡單的CSS來製作方便實用的文繞圖效果,且可以漂亮的對齊內文。

CSS語法
<style type="text/css">左邊文繞圖
.img_left
{
float:left;
}
.img_right
{
float:right;
}
</style>
<img class="img_left" src="http://f.blog.xuite.net/f7/b7/10055976/blog_6267/txt/126866/126866_8.gif" alt="" />右邊文繞圖
<img class="img_right" src="http://f.blog.xuite.net/f7/b7/10055976/blog_6267/txt/126866/126866_8.gif" alt="" />範例:
/* --- 文繞圖start -------------- */
div.image-left {
float: left;
margin: 0 8px 8px 0;
}

div.image-left img {
border: 1px solid #ccc;
padding: 4px;
}

div.image-left p {
color: #666;
font-family: 'Lucida Grande', Lucida Sans Unicode;
font-size: 9px ;
margin: 3px 0 0;
text-align: center ;
}
<div class="image-left">
<img alt="alter text" src="path.to.image" />
<p>caption caption caption</p>
</div>
Exchange 2007 安裝後發信設定筆記 (Socket Error # 10060)
因要用來寄發EDM,又無註冊網域,僅供內部發信使用時,請注意以下設定
當發信時出現以下錯誤
Winsock Error 10060 連線超時
Message from: to: Connect error in directly sending! Info : Socket Error # 10060
解決方法 - 原文
Analyse: You are on a an ISP (such as Earthlink or Mindspring) that blocks their users using any SMTP server other than their own.
Solutions: To set up Earthlink, Mindspring, or your ISP's SMTP servers for your outgoing email you must click on your account settings in the email client you are using (Outlook Express, Eudora, Netscape etc.)
In the SMTP (outgoing mail server) field you will enter smtp.earthlink.net (or whatever your dial up or direct access ISP's SMTP server is) as your SMTP server. You must then enter your Earthlink (or your ISP's) username and password for that mail server.
In Outlook Express it is at the bottom of that same tab. You must uncheck 'My server requires authentication' and click on 'settings' to enter your Earthlink (or your ISP's) username and password.
Your email will still be from your own domain name, the only difference is in the way it is routed throughout the Internet. Instead of being sent through our servers it is processed through Earthlink (or your ISP's) servers. This allows Earthlink (or your ISP) to monitor its users.
翻譯後
分析:你是在一個 ISP(如Earthlink或Mindspring),阻止他們的用戶使用其他任何SMTP服務器比他們自己。
解決方案:建立Earthlink的,Mindspring,或ISP的SMTP服務器為您的傳出電子郵件,您必須按一下您的帳戶設置中的電子郵件客戶端,您正在使用(Outlook Express中,Eudora和Netscape等)
在SMTP(發送郵件服務器)字段中,您將進入 smtp.earthlink.net(或者無論您的撥號或直接訪問 ISP的SMTP服務器)作為您的SMTP服務器。然後,您必須輸入您的Earthlink公司(或您的ISP)的用戶名和密碼的郵件服務器。
在Outlook Express是在底部的相同標籤。您必須取消選中'我的服務器要求身份驗證',點擊'設置'輸入您的Earthlink公司(或您的ISP)的用戶名和密碼。
您的郵件仍然會從你自己的域名,唯一的區別是它的方式傳送至整個互聯網。而是通過我們的服務器發送它是通過處理 Earthlink公司(或您的ISP)的服務器。這使得EarthLink公司(或您的ISP)來監測其用戶。
假如看不懂他的說明,那就自己比對下列畫面擷圖的相關設定,自己在思考一下就知道問題出在哪摟,但是若伺服器有對外(即是有實體的網域)時,建議不要如此設定,因為這樣很容易被當作跳板,被駭客或不知名的人透過你的伺服器瘋狂寄發垃圾郵件(因為不需要認證就可以發信),不久的將來你的ISP就會將你封鎖了
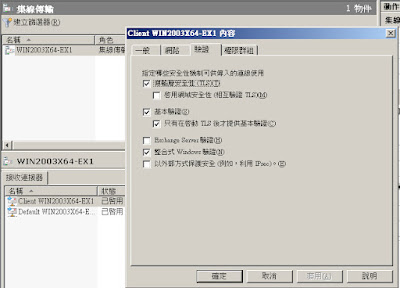
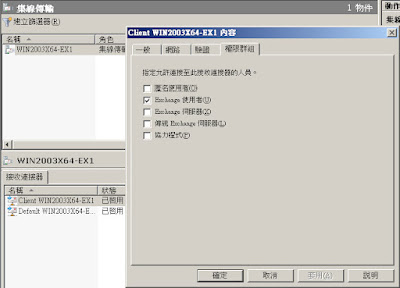
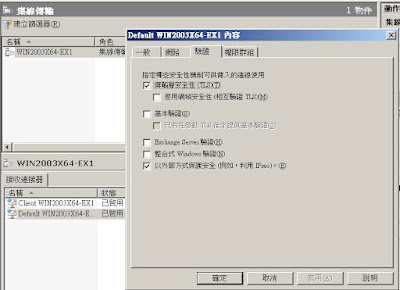
在「伺服器組態」--「集線傳輸」--「接收連接器」
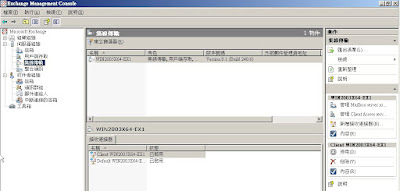
點選「Client xxxxxxxxxxxxxx」--調整「驗證」及「權限群組」中的安全性設定
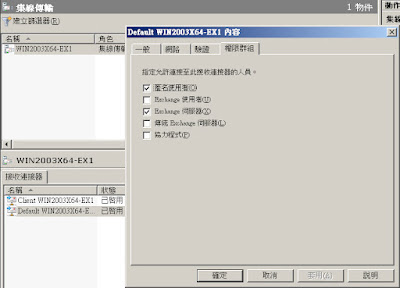
點選「Default xxxxxxxxxxxxxx」--調整「驗證」及「權限群組」中的安全性設定
當發信時出現以下錯誤
Winsock Error 10060 連線超時
Message from:
解決方法 - 原文
Analyse: You are on a an ISP (such as Earthlink or Mindspring) that blocks their users using any SMTP server other than their own.
Solutions: To set up Earthlink, Mindspring, or your ISP's SMTP servers for your outgoing email you must click on your account settings in the email client you are using (Outlook Express, Eudora, Netscape etc.)
In the SMTP (outgoing mail server) field you will enter smtp.earthlink.net (or whatever your dial up or direct access ISP's SMTP server is) as your SMTP server. You must then enter your Earthlink (or your ISP's) username and password for that mail server.
In Outlook Express it is at the bottom of that same tab. You must uncheck 'My server requires authentication' and click on 'settings' to enter your Earthlink (or your ISP's) username and password.
Your email will still be from your own domain name, the only difference is in the way it is routed throughout the Internet. Instead of being sent through our servers it is processed through Earthlink (or your ISP's) servers. This allows Earthlink (or your ISP) to monitor its users.
翻譯後
分析:你是在一個 ISP(如Earthlink或Mindspring),阻止他們的用戶使用其他任何SMTP服務器比他們自己。
解決方案:建立Earthlink的,Mindspring,或ISP的SMTP服務器為您的傳出電子郵件,您必須按一下您的帳戶設置中的電子郵件客戶端,您正在使用(Outlook Express中,Eudora和Netscape等)
在SMTP(發送郵件服務器)字段中,您將進入 smtp.earthlink.net(或者無論您的撥號或直接訪問 ISP的SMTP服務器)作為您的SMTP服務器。然後,您必須輸入您的Earthlink公司(或您的ISP)的用戶名和密碼的郵件服務器。
在Outlook Express是在底部的相同標籤。您必須取消選中'我的服務器要求身份驗證',點擊'設置'輸入您的Earthlink公司(或您的ISP)的用戶名和密碼。
您的郵件仍然會從你自己的域名,唯一的區別是它的方式傳送至整個互聯網。而是通過我們的服務器發送它是通過處理 Earthlink公司(或您的ISP)的服務器。這使得EarthLink公司(或您的ISP)來監測其用戶。
假如看不懂他的說明,那就自己比對下列畫面擷圖的相關設定,自己在思考一下就知道問題出在哪摟,但是若伺服器有對外(即是有實體的網域)時,建議不要如此設定,因為這樣很容易被當作跳板,被駭客或不知名的人透過你的伺服器瘋狂寄發垃圾郵件(因為不需要認證就可以發信),不久的將來你的ISP就會將你封鎖了
在「伺服器組態」--「集線傳輸」--「接收連接器」

點選「Client xxxxxxxxxxxxxx」--調整「驗證」及「權限群組」中的安全性設定


點選「Default xxxxxxxxxxxxxx」--調整「驗證」及「權限群組」中的安全性設定


2010年8月5日 星期四
Microsoft Visual SourceSafe 2005 (VSS2005) 操作手冊 - 各版本的檔案下載
步驟一:若要下載各版本檔案資訊,可點選您要下載之版本檔案,點選「Get」

步驟二:設定要儲存的位置後,按「OK」


步驟二:設定要儲存的位置後,按「OK」

Microsoft Visual SourceSafe 2005 (VSS2005) 操作手冊 - 版本異動紀錄查詢
步驟一:如上篇,在每個版本的檔案上,選擇你要比對的檔案版本

步驟二:在「Format」的部分,選擇「SourceSafe」,點選產生「Report」

步驟三:點選「Preview」

步驟四:即會出現被異動的行數,並顯示備異動的內容及方式


步驟二:在「Format」的部分,選擇「SourceSafe」,點選產生「Report」

步驟三:點選「Preview」

步驟四:即會出現被異動的行數,並顯示備異動的內容及方式

Microsoft Visual SourceSafe 2005 (VSS2005) 操作手冊 - 歷史版本查詢
步驟一:Visual SourceSafe 2005 (VSS2005) 登入畫面

步驟二:您可以在專案上,看到哪些檔案被「簽出已編輯」

步驟三:假設你要檢視檔案修改的版本紀錄,你可以在要檢視的檔案上按滑鼠右鍵,選擇「show History」

步驟四:然後點選「OK」

步驟五:就可以看到每一個版本及修改的時間、修改的人


步驟二:您可以在專案上,看到哪些檔案被「簽出已編輯」

步驟三:假設你要檢視檔案修改的版本紀錄,你可以在要檢視的檔案上按滑鼠右鍵,選擇「show History」

步驟四:然後點選「OK」

步驟五:就可以看到每一個版本及修改的時間、修改的人

訂閱:
文章 (Atom)